Step 1: Review & Respond to the Enquiry
When a new booking enquiry comes through, carefully review all the trip details before making a decision:
- Confirm the date and time of the booking.
- Check the pick-up and drop-off locations, and note any additional stops listed.
- Make sure the number of passengers fits within the seating capacity of your vehicle.
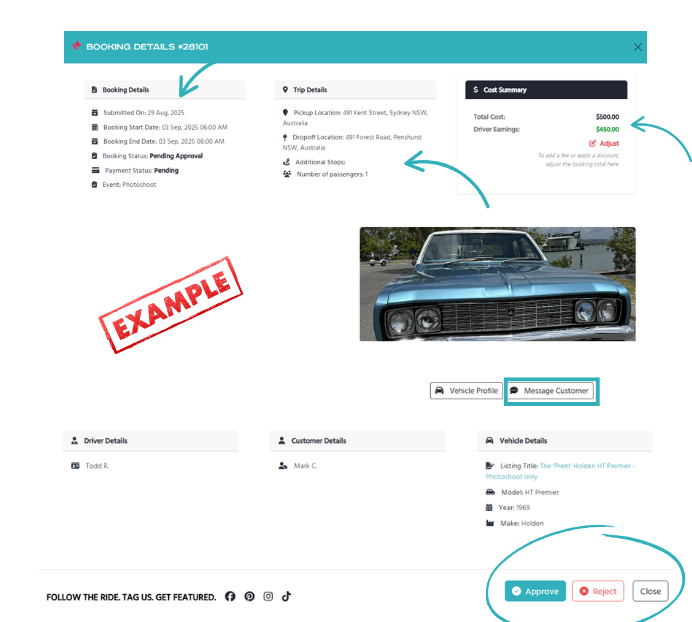
- Clarify details if needed – If anything is unclear, use the messaging system to confirm information with the customer before approving. This avoids misunderstandings and ensures both parties are on the same page.
- Apply price adjustments if required – You can add additional fees (e.g., for extra travel distance, extended hours, etc.) or adjust the price down if you’d like to offer a discount. Price updates are made directly in the booking form before payment.
- Approve the booking – If everything looks good and you’re available, click ‘Approve’ to let the customer know you’re ready to proceed.
- Reject the booking if unsuitable – If you’re unavailable, or the booking isn’t suitable for your vehicle or service, click ‘Reject’. The customer will be notified so they can make other arrangements.Always include a short reason when rejecting—for example: “I have another booking that day, sorry!” or “My vehicle can’t seat that many passengers.” This helps the customer understand why and keeps communication clear and professional.
Step 2: Making Edits to a Booking (Before Payment)
As a driver, you have the ability to make edits to a booking BEFORE the customer completes payment if needed.

Edits might include things like:
-
- Changing the date or start time – as requested by the customer
- Adjusting the booking timeframe (e.g., longer or shorter hours)
- Changing the actual date of the booking
These edits can only be made if mutually agreed on with the customer, and must be applied before payment is completed.
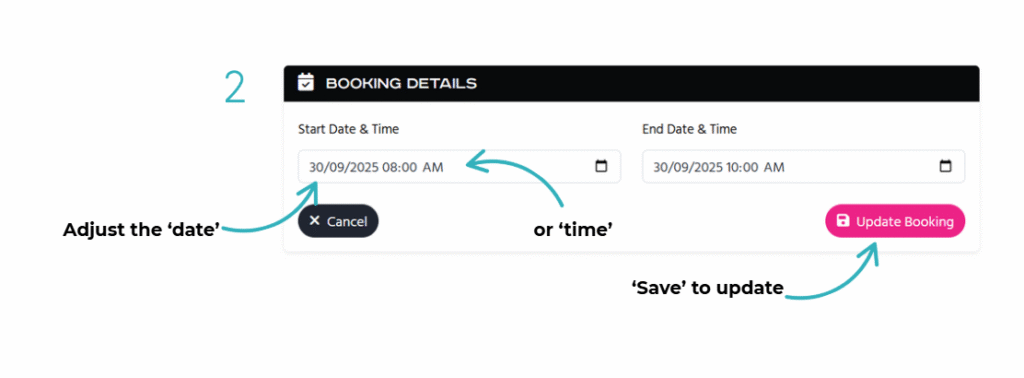
Note: These edits are NOT COMMON but can be applied if needed to make sure the booking is accurate and the customer is happy and ready to lock in their ride.
- Communicating edits: Always use the ‘Message Customer’ system to explain what has been changed and why. This keeps everything clear and avoids misunderstandings. All communication before payment must stay within the platform’s messaging system—personal contact details are not to be shared until the booking is confirmed.
💡 Important: Once the customer has paid, no further edits can be made. Any changes at that stage would require a new booking enquiry.
Step 3: Booking Is Approved & Pending Payment
Once approved, the booking enters a 7-day approval & pending payment window where the customer has time to lock in and pay for their ride.
👉 Important: If you don’t approve the booking, the customer will not be able to make payment. Approval must happen first before they can proceed.
During this 7-day window:
- The customer is sent email and SMS reminders to complete payment.
- They can choose to pay in full or use PayPal Payin4 (four interest-free instalments) to secure the ride.
Step 4: What Happens If Payment Isn’t Made?
If payment is not received within 7 days:
- The booking is automatically cancelled and the date released.
- You and the customer will be notified via email that the booking has expired.
Step 5: Booking Is Paid and Confirmed
Once the customer has completed payment:
- You’ll receive a confirmation that the booking is now ‘paid & confirmed’.
- The customer’s contact details will be included in your email confirmation and also available in your driver dashboard under the specific booking number. This makes it easy to keep track of all your bookings in one place.
👉 Expected Practice: Make contact with the customer as soon as possible after payment. A quick call and /or a message to introduce yourself, confirm event details, and discuss any special requests helps set clear expectations and builds trust ahead of the big day.
Step 6: Payment to Driver + Customer Review Request
After you’ve successfully completed the ride:
- Dream Rides will process your payment directly to your Paypal account one day after the booking has taken place.
- At the same time, the customer will automatically be invited to leave a review about their experience.
💡 Great reviews help you attract more bookings—so always aim to deliver an experience worth talking about!
Remember To Keep Your Calendar Up-to-Date
An up-to-date calendar ensures you only receive enquiries that match your availability and avoids disappointing customers. Keeping your calendar current helps you get more quality bookings and avoid conflicts.
👉 Read our full guide to calendar management here
Summary
- Approve enquiries to begin the 7-day pending payment phase.
- Customers are automatically reminded via SMS and email to pay.
- You can update pricing prior to approval
- No contact details should be shared until the ride is paid.
- Once paid, you’ll be notified and receive the customer’s contact info.
- Payment is made to your account one day after the ride is complete.
- A review request is sent to the customer when your payment is processed.
We’re here to help you create unforgettable moments—thanks for being part of the Dream Rides community!